Tutorial on making a tattoo stencil in Photoshop
- BLACK RAVEN

- 6 juni 2020
- 5 min läsning
First of all, I just want to say that this is by no means the only way to make a stencil or the best way, it´s just the way I do them and I thought it might give some tattoo artist ideas or help in some way.
I make all my designs in Photoshop (I might upload a tutorial on that as well if there´s any interest). And when the client have given her approval I move on to the stencil making and Photoshop makes it supereasy.
Make a new layer by pressing SHIFT + CTRL + N (or go to new layer in the layers column)
Make sure all of the layers you want to be included in the stencil are visible and then Stamp layers by pressing SHIFT + CTRL + ALT + E
Go to Filter --> Filter Gallery
Under the "Sketch" menu you will find "photocopy", go there and make adjustments so that the important details show
Press OK
Now you have a stencil! It will be a bit hard ro read for some designs, but that can be adjusted as well. Read the whole article for more tips on that!
1. New layer

Press SHIFT + CTRL + N or use the "new layer" buttom on the layer column (see image).
2. Stamp visible

Stamp visible layers by pressing SHIFT + CTRL + ALT + E. Here its important to have all the layers visible that you want to include in the stencil. Make sure you have a white background as well before stamping.
3. Filter gallery

Go to the top menu and find "Filter" then go to "Filter gallery". A new window will open with a bunch of different categories.
4. Photocopy

You will find "Photocopy" under the "Sketch" menu. This turns your image into an all black and white image with few shadings (the shaded or grey parts of the image will show on the stencil so make sure you adjust the detail and darkness so that those areas won't disrupt your lines).
For the most part I adjust darkness to fully dark (50). If that takes away to much detail I will make another stamped layer and do another one for the detailed parts (read how further down the tutorial).

5. Make the stencil
When you are satisfied with the amount of detail and blacks showing press OK.
6. Export the stencil
The stamped layer are now your stencil and you can export it as a png for printing.

If you have a design that needs some more clear details or if the stamped layer is to busy you can make some changes to it.
The stencil I´m working on here have some problem areas:

In most cases I would just leave the stencil as is and have a tablet with the design next to me while tattooing to guide me through some of the messy areas. But it takes some practise and to be honest, it´s better (and easier) to have a clear stencil to start with. So here is how I would clear up the problem areas:
How to make the stencil better for a detailed design
1. First step on this one is to make a new layer and just paint white over the lines.

2. Second step is to make the deer easier to read from the backgound. There are three ways to do that, in this case I have the deer cut out on it´s own layer. So one way is to do the following:
Go to the layer with the item you want to be clearer from the background. Double click the layer, this will open up a new window for layer style. Add a white stroke to the outside of the object.

I clean up the areas outside the deer showing the stroke where I don´t want it to show in the layer mask.
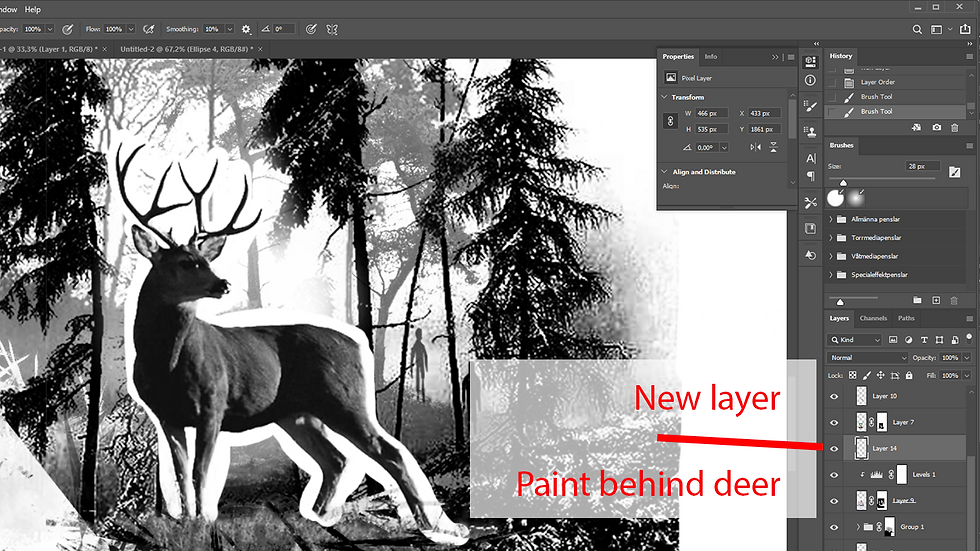
A second way is to make a new layer below the deer layer and paint behind it:

With this method it will be easier to control where the white areas are and how much of it you want.
The third way, if you don´t have the item in it´s own layer you can paint white around the object in a new layer above the item. This will take a little longer depending on the objects shape. So always try to have all the different items on your design in individual layers.
3. Third step is to make the details on the deer more visible. You can go straight into making a new stamped layer and do the photocopy filter again.
Make sure your first stamped layer (the stencil layer) is unvisible before stamping and do the same steps as before to make it into a photocopy, but this time adjust the filter to show more details.
If it´s hard to get clear details with just the photocopy adjustments you can pump up the contrast before doing that step:

I usually add a level adjustment layer to the top and adjust that so more details show. Don´t worry about how it looks on the design, just make sure the important details are clear. This is not ment to be the finished design, just the finished stencil.

In this case I made all the midtones lighter and the darks a bit blacker so that the eye and mouth are more visible.
4. Forth step is to make a new photocopy filter with more details. So make a new stamped layer at the top of your layers and do the photocopy filter again with adjustments to show details. Don´t worry about the image as a whole but instead look at the details you want to show.

5. Now you will end up with two diffent stencil layers:

The first stencil you made have some more blacker areas with thicker lines but are harder to read. The second one is better for details and easier to read but may need some more black areas. The easiest way to add the parts from the first stencil to the second one is to add a layer mask to your second stencil and mask away areas. This will show the layer below on the masked areas and therefore add that to your finished stencil.


Hopefully you can see that I removed quit a lot from the second stencil layer to get some black back to the stencil.
Finally, export image and have fun tattooing!

You should note that the areas with thinner lines will be easier to wipe away during the tattooing process so let the stencil dry well before starting to tattoo and be careful when wiping those areas to not wipe away too much.
I hope this helped some and if you have any questions about the stencil making process please feel free to comment below.
Did you like the tutorial? Wan´t more similar tutorials? Please comment below and I might just do a few more.


Kommentarer